Setting up a NAT gateway on AWS using Terraform
We’re in the middle of migrating a lot of our infrastructure components to AWS. One thing that took me a while to wrap my head around is how to setup a VPC (Virtual Private Cloud) at AWS in a way that all our outgoing traffic is routed via a fixed IP address. In this article I will demonstrate how this can be done, using Terraform to setup all required resources at AWS.
Context
First we’ll look a bit more at the context in which we’re operating.
Let’s assume that we have the following setup:
- we have a series of worker machines within a private network executing our business logics.
- we don’t want these machines to be publicly reachable via the internet as we try to minimize any attack vectors
- we need to access several external systems, which are out of our control and out of our local network.
- we need to have a fixed IP (or a series of fixed IPs) for outgoing traffic, because some of the external systems use IP whitelisting to allow access.
Infrastructure setup
We’re loosely following the AWS tutorial at
https://aws.amazon.com/de/premiumsupport/knowledge-center/nat-gateway-vpc-private-subnet/
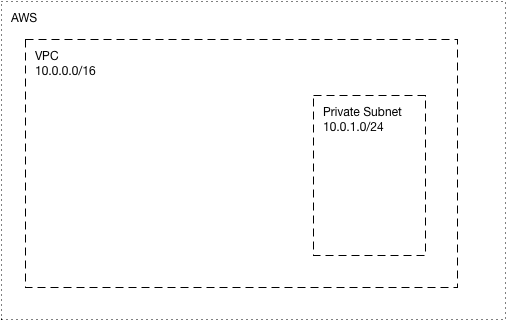
So let’s start and create our resources. First of all we need our actual VPC and a private subnet in which to place our EC2 instance.
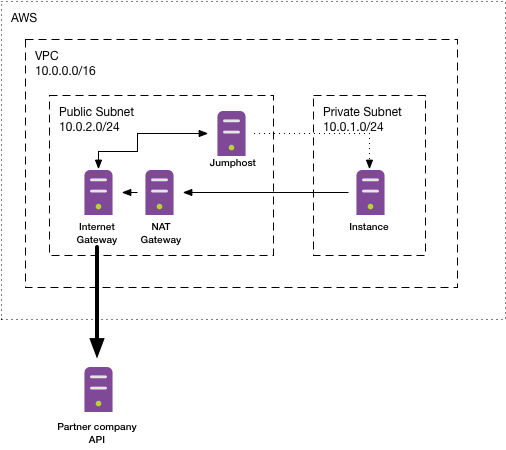
From a network perspective things look like this:
Using Terraform these are the resources that we need to create:
provider "aws" {
  region = "eu-central-1"
}

resource "aws_vpc" "vpc" {
  cidr_block = "10.0.0.0/16"
  enable_dns_hostnames = true
  enable_dns_support = true
  tags = {
    "Name" = "Dummy"
  }
}

data "aws_availability_zones" "available" {}

resource "aws_subnet" "instance" {
  availability_zone = data.aws_availability_zones.available.names[0]
  cidr_block = "10.0.1.0/24"
  vpc_id = aws_vpc.vpc.id
  tags = {
    "Name" = "DummySubnetInstance"
  }
}
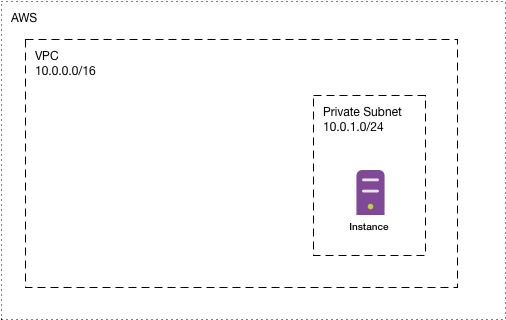
Now let’s put our instance inside the subnet. For this example we’re using a default Ubuntu image which will make it easy later on to verify that the connection actually works. For real use cases, this instance would need to be tailored.
resource "tls_private_key" "ssh" {
  algorithm = "RSA"
  rsa_bits  = 4096
}

resource "aws_key_pair" "ssh" {
  key_name = "DummyMachine"
  public_key = tls_private_key.ssh.public_key_openssh
}

output "ssh_private_key_pem" {
  value = tls_private_key.ssh.private_key_pem
}

output "ssh_public_key_pem" {
  value = tls_private_key.ssh.public_key_pem
}

resource "aws_security_group" "securitygroup" {
  name = "DummySecurityGroup"
  description = "DummySecurityGroup"
  vpc_id = aws_vpc.vpc.id
  ingress {
    cidr_blocks = ["0.0.0.0/0"]
    from_port = 22
    to_port = 22
    protocol = "tcp"
  }
  egress {
    cidr_blocks = ["0.0.0.0/0"]
    from_port = 0
    to_port = 0
    protocol = "-1"
  }
  tags = {
    "Name" = "DummySecurityGroup"
  }
}

resource "aws_instance" "ec2instance" {
  instance_type = "t2.micro"
  ami = "ami-03d8059563982d7b0" # https://cloud-images.ubuntu.com/locator/ec2/ (Ubuntu)
  subnet_id = aws_subnet.instance.id
  security_groups = [aws_security_group.securitygroup.id]
  key_name = aws_key_pair.ssh.key_name
  disable_api_termination = false
  ebs_optimized = false
  root_block_device {
    volume_size = "10"
  }
  tags = {
    "Name" = "DummyMachine"
  }
}

output "instance_private_ip" {
  value = aws_instance.ec2instance.private_ip
}
There is a little bit more going on than just create the aws_instance.
In order to be able to connect to the machine at a later point in time we first need to create an TLS private/public key combination.
We also need a security group to define which network traffic is allowed to enter and exit our machine.
Here we simply allow all outgoing traffic (all ports to all destinations) and ann incoming traffic on port 22 (SSH).
Now we have our machine inside our private subnet. After applying the configuration we can check the private IP of the instance inside our VPN:
$ terraform output instance_private_ip
In our example the IP assigned by AWS to the instance is 10.0.1.172 (we’ll need this again at a later point in time).
Our instance can’t do very much right now - it cannot accept any connections from the outside world and it also cannot make any connection to the outside world so at the current point it’s pretty much useless.
To make connections to the outside world, we would need an internet gateway that routes data from our private subnet to the internet. But having an internet gateway would also mean that our machine would need an external IP from which the traffic originates. This is not what we want to do.
Instead we want the private subnet to stay private (and have no routing to the internet) but instead have a second subnet. In that second subnet we can put an internet gatway which allows us to connect to the outside world from any resources inside this second subnet:
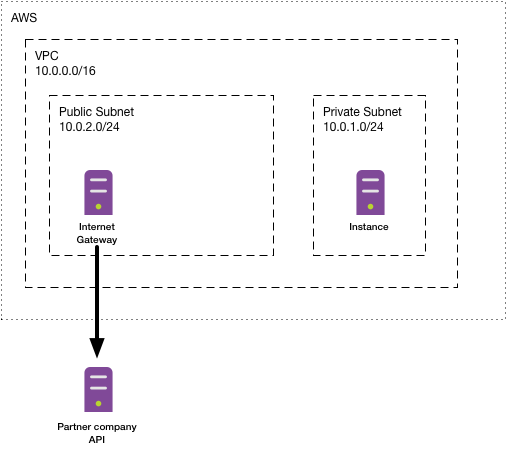
resource "aws_subnet" "nat_gateway" {
  availability_zone = data.aws_availability_zones.available.names[0]
  cidr_block = "10.0.2.0/24"
  vpc_id = aws_vpc.vpc.id
  tags = {
    "Name" = "DummySubnetNAT"
  }
}

resource "aws_internet_gateway" "nat_gateway" {
  vpc_id = aws_vpc.vpc.id
  tags = {
    "Name" = "DummyGateway"
  }
}

resource "aws_route_table" "nat_gateway" {
  vpc_id = aws_vpc.vpc.id
  route {
    cidr_block = "0.0.0.0/0"
    gateway_id = aws_internet_gateway.nat_gateway.id
  }
}

resource "aws_route_table_association" "nat_gateway" {
  subnet_id = aws_subnet.nat_gateway.id
  route_table_id = aws_route_table.nat_gateway.id
}
We have setup the subnet itself as well as the internet gateway.
We’ve also created a route table that routes all traffic from this new subnet to any host (0.0.0.0/0) through the internet gateway.
The last remaining step is to route the traffic from our instance inside our private subnet through the public subnet. This can be done using a NAT gateway, which will route the traffic from our instance to the public network and finally through the internet gateway to the outside.
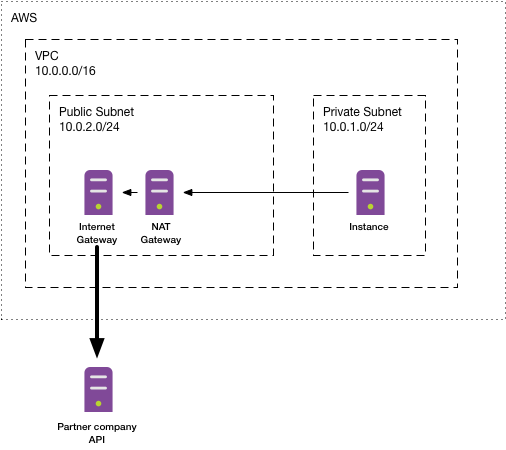
resource "aws_eip" "nat_gateway" {
  vpc = true
}

resource "aws_nat_gateway" "nat_gateway" {
  allocation_id = aws_eip.nat_gateway.id
  subnet_id = aws_subnet.nat_gateway.id
  tags = {
    "Name" = "DummyNatGateway"
  }
}

output "nat_gateway_ip" {
  value = aws_eip.nat_gateway.public_ip
}

resource "aws_route_table" "instance" {
  vpc_id = aws_vpc.vpc.id
  route {
    cidr_block = "0.0.0.0/0"
    nat_gateway_id = aws_nat_gateway.nat_gateway.id
  }
}

resource "aws_route_table_association" "instance" {
  subnet_id = aws_subnet.instance.id
  route_table_id = aws_route_table.instance.id
}
The first two resources (aws_eip and aws_nat_gateway) build up the NAT gateway itself.
The fixed IP address we reserve via aws_ip and connect to the aws_nat_gateway) will be the address that any external host will see as source address once we make a request from our instance.
In our example that IP address that AWS reserved for us is 3.126.43.207.
So our setup is finally complete: We do have an EC2 instance in our private network that is not accessible from the outside world but itself is able to access the outside world through the NAT gateway.
To test this we somehow need to access our EC2 instance and execute some command to see that the connectivity actually works.
However we can only access the instance from inside our VPN so let’s also provision a jumphost that is sitting inside the public subnet of our VPC and therefore can be accessed from the internet:
resource "aws_instance" "ec2jumphost" {
  instance_type = "t2.micro"
  ami = "ami-03d8059563982d7b0" # https://cloud-images.ubuntu.com/locator/ec2/ (Ubuntu)
  subnet_id = aws_subnet.nat_gateway.id
  security_groups = [aws_security_group.securitygroup.id]
  key_name = aws_key_pair.ssh.key_name
  disable_api_termination = false
  ebs_optimized = false
  root_block_device {
    volume_size = "10"
  }
  tags = {
    "Name" = "DummyMachineJumphost"
  }
}

resource "aws_eip" "jumphost" {
  instance = aws_instance.ec2jumphost.id
  vpc = true
}

output "jumphost_ip" {
  value = aws_eip.jumphost.public_ip
}
We want to make the jumphost available on a fixed IP as well so we provision another aws_eip specifically for this usage.
We also reuse the SSH key that we have created for the actual instance.
Once our jumphost is up and running we can connect to it.
First we need to extract the private key that we have generated and store it locally so that SSH is able to use it to establish a connection:
$ terraform output ssh_private_key_pem > ~/Downloads/key.txt
$ chmod 700 ~/Downloads/key.txt
We can get the IP address that has been assigned by AWS by calling:
$ terraform output jumphost_ip
In our example the IP that was assigned by AWS is 3.126.115.136.
Now let’s connect:
$ ssh -i ~/Downloads/key.txt ubuntu@3.126.115.136
The connection succeeds and we are logged in to our jumphost:
ubuntu@ip-10-0-2-176:~$
We can see that the internal IP of our jumphost is 10.0.2.176 which is to be expected as we have placed it into the public subnet (10.0.2.0/24)
As we are now in the same VPC as our actual instance we can again connect from the jumphost to our actual instance.
From the steps prior we know that the internal IP or our instance is 10.0.1.172 so that’s the target to which we will have to make our connection from the jumphost.
But wait: We don’t have the private SSH key yet on the jumphost so we’ll need to create this as well.
The easiest way is to reuse the value that we used when creating the key.txt file on our local machine, so we’ll copy that into the clipboard, open a file named key.txt on the jumphost and paste the key into that file.
Now we can make the connection to our instance from the jumphost:
ubuntu@ip-10-0-2-176:~$ ssh -i key.txt 10.0.1.172
Voila, we’re now connected to our actual instance through the jumphost:
ubuntu@ip-10-0-1-172:~$
The original requirement was that any outgoing traffic from our actual instance goes through the NAT gateway and that any target location sees the request coming from the IP address of the NAT gateway. Let’s verify that by calling an external resource from our actual instance:
ubuntu@ip-10-0-1-172:~$ curl 'https://api.ipify.org'
As expected the response from ipify (which will simply return the IP address of the host making the request) is the reserved IP address reserved for the NAT gateway:
ubuntu@ip-10-0-1-172:~$ curl 'https://api.ipify.org'
3.125.12.131
That’s it!
We managed to setup our instance in a private subnet that is not accessible from the outside world but is still able to connect to the outside world via the NAT gateway.